How to Reduce Skin Shine in Premiere Pro (Lumetri HSL Secondary and a Plugin)
This article shows how to tone down shine on foreheads, noses and cheeks in Premiere Pro, first with the built-in tools and then with a plugin.
I am a video editor in Japan (music videos, interviews and commercials) and the developer of Totonoe Skin Retouch, the plugin in method 3.
Short answer
For shine across a face, use HSL Secondary in Lumetri Color to select only the bright skin, then lower its lightness a little. For one spot, such as the tip of the nose, draw a mask on a second Lumetri Color effect and track it.
If you have many cuts, a skin retouch plugin with a De-Shine control is faster, because it does not need a new selection for every shot.
What shine looks like on camera
Shine is light reflecting off oil or sweat on the surface of the skin. In video it appears as an area that is brighter than the surrounding skin and also paler in color.
A fix therefore needs two things: lower the brightness, and bring back a little of the skin color that was washed out. Lowering the highlights or whites in Basic Correction would also darken white clothing and walls, so select the skin first.
Method 1: Select bright skin with HSL Secondary and darken it
- Select the clip and open the Lumetri Color panel (Window > Lumetri Color). Click HSL Secondary to open it.
- In Key, use the Set color eyedropper and click the shiny area.
- Check Color/Gray to see the selection. Gray areas are not selected. If the selection spreads past the shine, narrow the L slider toward the bright side.
- In Refine, raise Denoise and Blur to blend the edge of the selection. Shine has a soft edge, so a hard selection edge makes the corrected area look pasted on.
- Uncheck Color/Gray. Under Correction, pull the vertical slider next to the color wheel down a little to darken the selection. If it still looks pale, raise Saturation slightly to bring the skin color back.
- Compare with the footage before correction.
Darkening too far turns the shiny area gray and dull, so stop while a little shine remains.
Method 2: Draw a mask around one spot and track it
If only the tip of the nose or part of the forehead is shiny, darkening just that area is quicker.
- Add a second Lumetri Color effect to the same clip, from the menu at the top of the Lumetri Color panel. Keeping it separate from your color correction means that correction stays as it is outside the mask.
- With the new Lumetri Color effect selected, use the ellipse mask tool and draw around the shiny area in the Program Monitor. In Premiere Pro 2026 the mask-creation tools are in the Tools panel, not in buttons under the effect in Effect Controls.
- In Effect Controls, raise the mask feather so the edge blends. The default is 0, so the edge shows until you raise it.
- Click the tracker button that tracks the selected mask forward and backward.
- In the second Lumetri Color's Basic Correction, lower the highlights or the exposure. Only the inside of the mask gets darker.
If the mask drifts when the head turns, fix its position on that frame and track again from there.
Limits of methods 1 and 2
- White clothing, white walls and reflections of lights are bright and pale as well, so they are easily selected together with the shine.
- The position and size of shine change with head angle and lighting, so the selection can fluctuate, the correction can flicker, and masks drift.
- You have to redo the eyedropper selection or the mask whenever the shot or the lighting changes.
The general skin smoothing version of this method is in How to Retouch Skin in Premiere Pro.
Tips for a natural look
- Do not remove all of the shine. The highlights on the nose bridge and cheekbones give the face its shape, and removing them makes the face look flat.
- For log footage, apply a color conversion first (for example a Rec.709 LUT). In log, brightness and color are hard to judge.
- Check at 100% zoom, compare with the footage before correction, and do the final check on the exported video.
Method 3: Reduce shine with a plugin (De-Shine)
Totonoe Skin Retouch has a De-Shine slider that reduces shine and highlights on skin. It is a one-time purchase of US$65 on Gumroad and works in Premiere Pro and After Effects 2025 or later.
- Apply the effect Skin Retouch to the clip. Skin is detected automatically.
- Raise De-Shine in Effect Controls. It ranges from 0 to 100 and defaults to 0. Use it only on the cuts that need it, and stay at or below about 40.
If both shine and blemishes are visible, choose the Strong preset, which also sets De-Shine to 25, then adjust De-Shine alone.
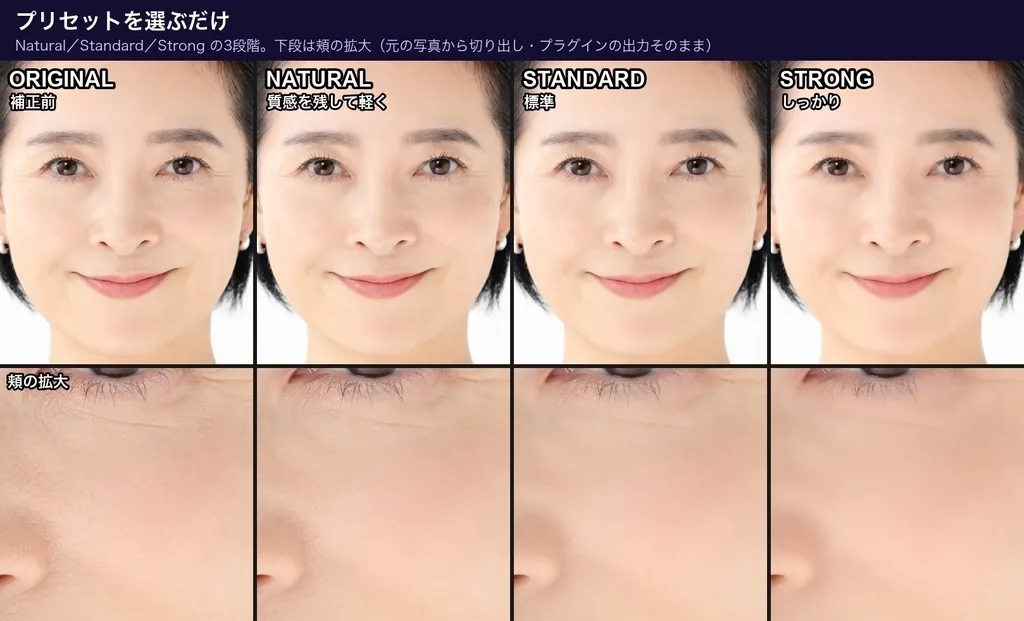
You can try De-Shine on your own footage with the free trial. It has every feature of the full version; the only difference is a faint diagonal-stripe watermark on the video.
How it differs from methods 1 and 2
- It works only inside the area detected as skin, and it darkens skin that is brighter than its surroundings. Skin without shine barely changes.
- It detects skin on every frame, so you do not redo a selection or mask for each cut.
- The smoothing keeps edges (eyes, brows, lashes and hair stay sharp), Texture adds back fine pore texture, and Temporal Stability steadies the skin detection in moving shots.
Limits
The plugin detects skin by color, so everyone with a similar skin tone in the shot is retouched. To limit it to one person, combine it with a mask in Premiere Pro. If it picks up a background with a skin-like color, turn on Show Mask and narrow Hue Range. Log footage needs a Rec.709 conversion before the effect. This version does not run in DaVinci Resolve, Final Cut Pro or Avid. The DaVinci Resolve version is a separate product (Mac only).
Everything is processed on your computer. Your footage is never sent to a server, and the plugin works offline after installation. It runs on Mac (macOS 13 or later, Apple Silicon and Intel) and, from November 16, 2026, on Windows (CPU only). For all parameters, see the user guide, and for a comparison with another well-known plugin, see Beauty Box Alternative for Premiere Pro and After Effects.
Windows support is added to the product on November 16, 2026, at no extra cost for existing buyers. Until November 15, 2026 a free Windows beta is available on the beta page on BOOTH.
FAQ
Can I remove skin shine in Premiere Pro without a plugin?
Yes. Select the bright skin with HSL Secondary in Lumetri Color and lower its lightness in the Correction section. For one small spot such as the tip of the nose, draw a mask on a second Lumetri Color effect and track it.
Why does lowering Highlights or Whites not fix shine on a face?
Those sliders darken the bright parts of the whole frame, such as white clothes and walls, not only the shine on skin. To darken only the shine, select it first with HSL Secondary or a mask.
How much De-Shine should I use in Totonoe Skin Retouch?
De-Shine ranges from 0 to 100 and defaults to 0. Raise it only on the cuts that need it; the guide suggests staying at or below about 40. The Strong preset sets it to 25.
Will it darken the shine on everyone in the shot?
The plugin finds skin by color, so everyone with a similar skin tone is affected. To limit the effect to one person, combine it with a mask in Premiere Pro.